|
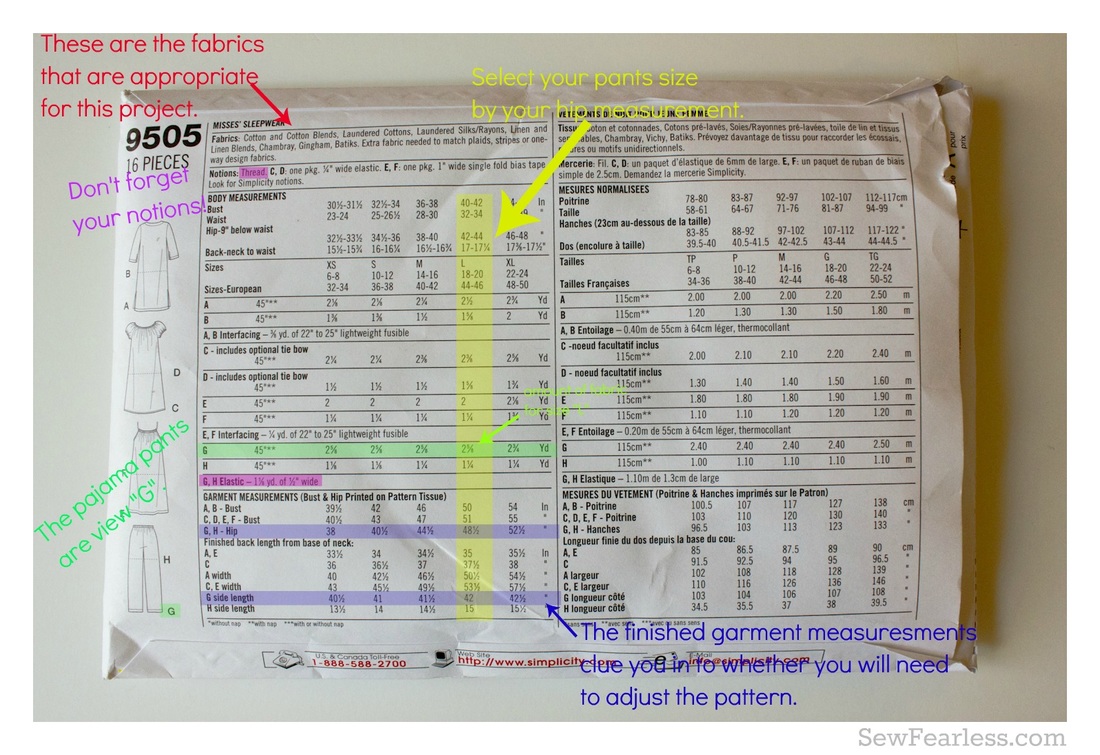
~ Starting to sew clothing from patterns Selecting a pattern If you are just beginning to sew for yourself, choose a relatively simple pattern. Something that is simple in style, not too fitted and without fancy details is a good starting point. Lounge pants with elasticized waists, smock style tops, or A-line skirts could be a good choice. Have a look at the pattern photos and/or illustrations and the line drawings that accompany it, checking both the front and back views. Many pattern companies have their catalogues available online. This can be a great way to compare styles and while away the hours! Tips for style selection Have a good look in the mirror, and a look at the clothes that are already in your wardrobe. What styles suit you the most? Which clothes are your favorites? Why? How tight or loose do you like your clothes to be? This is called ease. Clothing needs a certain amount of ease so that you can move in it! The rest of the ease is design ease, which is part of the style. Measure some of your favorite clothes and compare the clothing measurements to your measurements to work out how much ease you prefer your clothing to have. Tips for size selection You need to measure yourself before you decide what size pattern to buy. Commercial patterns are sized quite differently to ready-to-wear clothes. Choose skirt and pant pattern size according to your hip measurement, and top and dress pattern size according to your bust measurement if you are a B cup or smaller, or high bust measurement if you are a C cup or above. If you are a C cup or above you can make a full bust adjustment (FBA) to accommodate your bust measurement, and you will have a better fit around your upper chest, shoulders and neck. We’ll learn more about full bust adjustments next week on the blog. Once you have selected your pattern, have a look at the finished garment measurements printed on the pattern envelope back, and printed on the pattern pieces. Compare them to your own measurements, and the measurements you got from your favorite clothes. These will help you decide what size pattern to cut out, depending on how much ease you prefer. Many patterns are multi-sized. With a multi-sized pattern you can cut out one size for the bust, grade to another for the waist, then grade to another for the hip in order to best match your own measurements. For example, I generally fit into an Australian size 10 or 12 in ready-to-wear (US size 6 or 8), but my full bust measurement would make me a size 14 in patterns. However, I wear a C cup bra, so going by my high bust measurement I need a size 12 pattern. I am quite honest about my figure strengths and weaknesses, so know that often patterns are too large across my shoulders and much too small around my waist and stomach. So, where possible, I buy a pattern that includes sizes 10, 12 and 14, and make adjustments where necessary depending on the amount of ease that I want and how much ease is included in the garment design. Pattern envelope front The pattern front generally includes an illustration and/or photo of the finished garment, often in a few variations which can all be made from the same pattern. These illustrations and photos are generally on tall slim models, so be aware that the proportions may be a little different on your own figure (unless you are tall and slim as well)! Pattern envelope back The back of the pattern envelope usually has a line drawing of the back of the garments. Some patterns will have a written description of the garment. Body measurements and finished garment measurements are usually printed on the back of the pattern envelope, in addition to the amount of fabric needed to make the garment. There will also be a list of suitable fabrics; this is important! Patterns are designed for particular types of fabric weights, drape, weave, thickness, and stretch, so it is essential to choose an appropriate fabric for the pattern in order to maximize your chances of getting a good result. Patterns designed for light to mid-weight woven cottons are a great place to start when you’re beginning to sew. The pattern envelope back also has information about notions; these are the extra things that you’ll need in order to make the garment, like thread, buttons, elastic, zips, trim, etc. Pattern instruction sheet Before you get out your scissors and pins, read through the pattern instructions! Most patterns start off with line drawings of the front and back of the garments, in all the views included in the pattern. There is usually an illustration of the pattern pieces, with each piece numbered and identified. General sewing instructions follow, then a cutting layout. Choose the layout appropriate for the size you are making, and the width of the fabric that you have chosen. It might be worth highlighting which layout you need to use. Read through each step of the sewing process. Try to visualize what you’ll be doing. If there are different views included in the same pattern, highlight each step that you are going to follow for the view that you have chosen. Pattern pieces Pattern pieces are normally printed on tissue paper. Identify and cut out each pattern piece that you need to make the view you have chosen. Use paper scissors, not your good fabric scissors! You can cut these out roughly outside the outer marked line of each pattern piece. I usually iron each piece with a dry iron to get rid of any creases and make the pattern pieces easier to handle. Make any alterations that you need, such as shortening or lengthening pattern pieces at the marked adjustment lines. If you make these changes at the marked adjustment lines you keep the proportions and style of the design much more than if you simply added or removed length at the bottom. If you are using a multi-sized pattern you might want to use a highlighter pen to trace over the size you are using, especially in places where you change from one size to another. Lay them on your fabric according to the cutting layout in the instructions, and pin into place. Pattern markings Grainlines: Fabric is woven from horizontal and vertical threads. The grainlines are marked on the pattern with long double-ended arrows. These need to be aligned with the vertical threads in the fabric. The cutting layout takes the grainlines into account when showing you how to place the pattern pieces. Sewing Lines and Seam Allowances: The seam allowance is generally included in the pattern piece, so that the marked line is the cutting line. The sewing line isn’t marked, but is usually 5/8” in from the edge of the pattern piece. The cutting line is printed differently for each size. Notches: These are the little triangle shapes on the pattern piece. They should be cut outwards when you come to them. They are important points where pattern pieces will be matched together. Dots and Squares: Mark dots and squares onto the fabric with thread tacks or with a fabric marking pen or pencil or chalk (choose something that isn’t permanent). Once again, these are important points where pieces will be matched together or where stitching will need to start or finish. Other Markings: Transfer the outlines of darts, pleats or other markings to the fabric pieces with thread tacks or with a fabric marking pen or pencil or chalk (once again, choose something that isn’t permanent). Getting the Right Fit Getting clothing to fit well is a huge topic. Luckily, there are plenty of excellent references around to help. You will find that the more clothing you sew for yourself, the more you will know your own body and which adjustments you need to make. And after all, we sew for ourselves so that we can get the fit that we want! As a starting point to getting fit right you need to:
Image found on Sew Fearless
1 Comment
5/3/2023 11:08:23 pm
Glad I was able to read this guide on how to read a pattern. The step-by-step instructions and clear explanations make it easy for even a beginner like me to follow along. I'll definitely be referencing this post in my future sewing projects. Thanks for sharing.
Reply
Leave a Reply. |
AuthorHi Im Lorna! Head honcho teacher @ WPMD. We hope you enjoy our content x Archives
August 2016
Categories |
Location |
|


 RSS Feed