Menu
When Poppy Met Daisy
  • Home
  • We Offer...
    • Courses
    • Gift vouchers
  • Party with WPMD
  • Our Brand
    • About Us
    • Contact us
  • Gallery
  • Calendar
  • Behind the Seams: Tips and Tricks
  • FAQ
  • Terms & Conditions
  • Testimonials
  • Blog
  • Covid Precautions
  • Home
  • We Offer...
    • Courses
    • Gift vouchers
  • Party with WPMD
  • Our Brand
    • About Us
    • Contact us
  • Gallery
  • Calendar
  • Behind the Seams: Tips and Tricks
  • FAQ
  • Terms & Conditions
  • Testimonials
  • Blog
  • Covid Precautions

Studio Style

8/5/2016

0 Comments

 
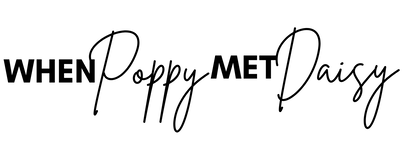
This week we take an inside look at the When Poppy Met Daisy studio. The home of creation, innovation and fashion, to see what goes on behind the scenes of Dublin’s most stylish fashion design school. Innovation and creation starts at the When Poppy Met Daisy school on Capel Street every day as we take in students from all ages, exhibiting all styles, who ultimately create an array of beautiful designs from scratch. Atmosphere and ambience is key to creating the most comfortable and creative environment for you to unleash your creative flair. When Poppy Met Daisy prides itself on our upbeat and relaxed approach to learning. The studio consists of two rooms designated for designing, patterning, sewing and learning. If you have ever thought about creating your own design, styles, patterns and clothing in a relaxed environment, then this is the place for you. As well as being the owner of When Poppy Met Daisy, Lorna, is also a stylist and fashion designer who is frequently recognised in Irelands leading magazines for her styling and design work. Working and learning alongside such an experienced fashion stylist and designer gives the student an inside into the world of fashion and dressmaking. When the studio is not in use for classes, it is constantly used for designing, styling and creation, with fashion shoot and editorial preparations, and the team generally keeping the world of fashion design turning.  Take a look at some of our backstage pics for a sneak peek at what goes on behind the scenes.
Picture
0 Comments

When Poppy Met Daisy: My experience. 

7/25/2016

0 Comments

 
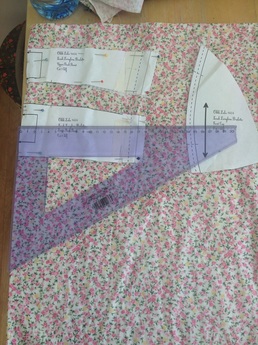
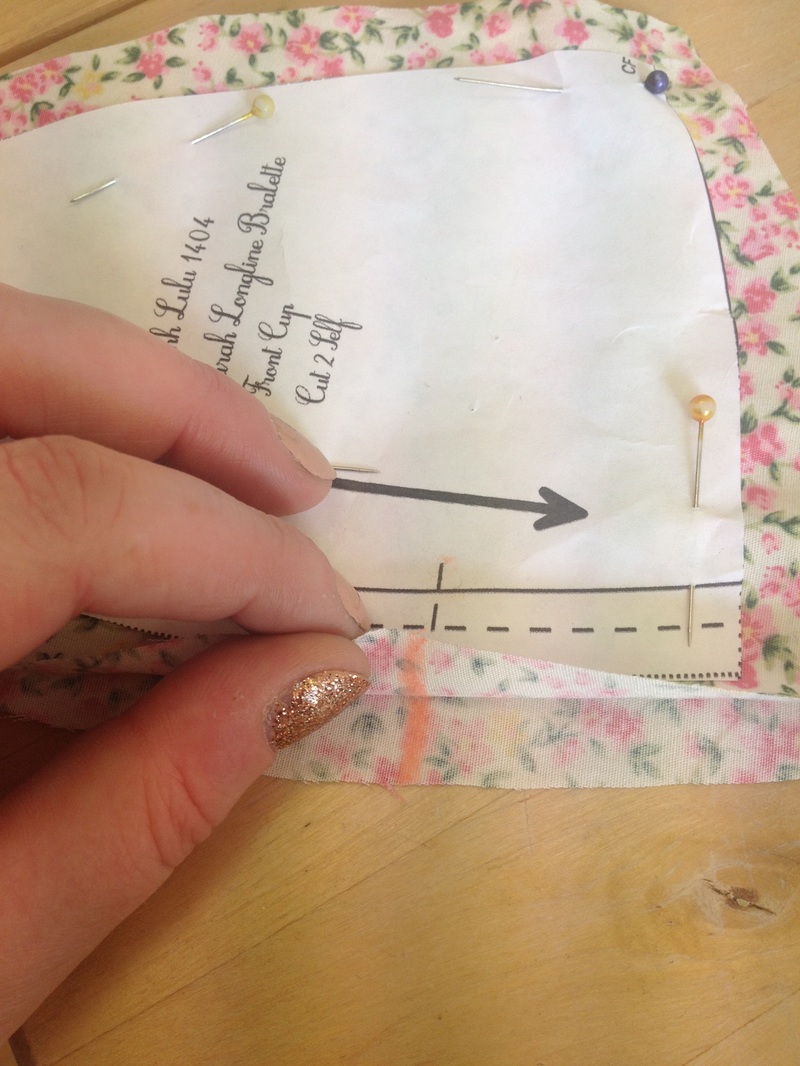
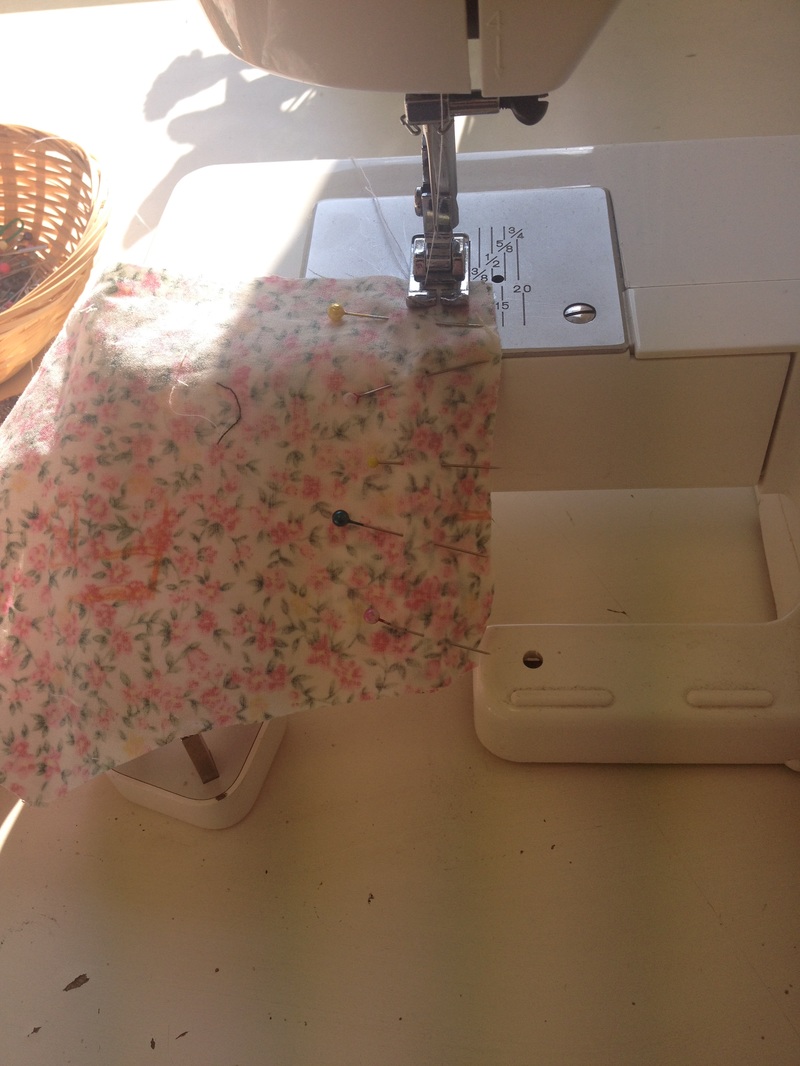
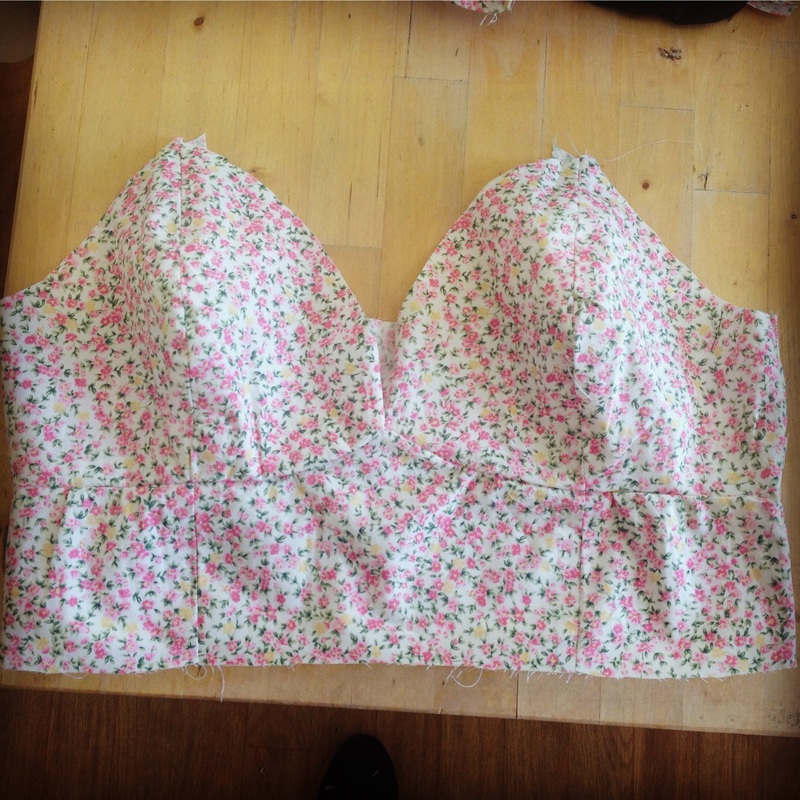
This weeks post is all about the When Poppy Met Daisy student. As a student at WPMD, I want to share my experience of the six week dress making course. The course is for everyone, whether it is to develop skills or to start a new hobby. Starting something new can be daunting, but with the help, skill and knowledge of Lorna the course is both rewarding and enjoyable. So, lets get started with what the course entails. Firstly, choose a pattern. This pattern is what you will dedicate your time to within the six weeks. Choose whichever pattern you desire and get ready to create something which you can be proud of.  Lorna will then instruct you on how to construct your garment. Throughout the course Lorna is there for any queries and will help you every step of the way. It's like having your own personal fashion designer by your side. Personally, I could not even sew up a sewing machine, yet ended up with a vintage style crop top to show off. The finished product highlights the attention Lorna gives to each student. Lorna teaches individually with a relaxed atmosphere throughout the studio. After the six weeks you will be able to flaunt your own garment, made from scratch, by none other than YOU. I chose the six week dress making course as I have always had an interest in fashion design, and I am constantly thinking of clothing I would love, but cant find on the High Street.  So if developing a skill, whilst having an enjoyable and creative experience is for you, then check out the wide range of courses that are available. Take it from someone who has experienced all the course has to offer, whether it is basic alterations or designing your own garment, When Poppy Met Daisy has the course for you. There are some great courses happening soon including the 3 day intensive fashion design course starting the 25th of July and finishing up on the 27th of July, if that doesn't suit this course also runs from 8th August-10th August. If you are around this weekend we have an exciting one day pattern drafting course on Sunday at 12.00.
Until next time,
​Emma,
When Poppy Met Daisy student. 


Picture
0 Comments

How to read a pattern 

2/17/2016

0 Comments

 
 ~ Starting to sew clothing from patterns
Selecting a pattern
If you are just beginning to sew for yourself, choose a relatively simple pattern. Something that is simple in style, not too fitted and without fancy details is a good starting point. Lounge pants with elasticized waists, smock style tops, or A-line skirts could be a good choice. Have a look at the pattern photos and/or illustrations and the line drawings that accompany it, checking both the front and back views. Many pattern companies have their catalogues available online. This can be a great way to compare styles and while away the hours!

Tips for style selection
Have a good look in the mirror, and a look at the clothes that are already in your wardrobe. What styles suit you the most? Which clothes are your favorites? Why? How tight or loose do you like your clothes to be? This is called ease. Clothing needs a certain amount of ease so that you can move in it! The rest of the ease is design ease, which is part of the style. Measure some of your favorite clothes and compare the clothing measurements to your measurements to work out how much ease you prefer your clothing to have.

Tips for size selection
You need to measure yourself before you decide what size pattern to buy. Commercial patterns are sized quite differently to ready-to-wear clothes.
Choose skirt and pant pattern size according to your hip measurement, and top and dress pattern size according to your bust measurement if you are a B cup or smaller, or high bust measurement if you are a C cup or above. If you are a C cup or above you can make a full bust adjustment (FBA) to accommodate your bust measurement, and you will have a better fit around your upper chest, shoulders and neck. We’ll learn more about full bust adjustments next week on the blog.
Once you have selected your pattern, have a look at the finished garment measurements printed on the pattern envelope back, and printed on the pattern pieces. Compare them to your own measurements, and the measurements you got from your favorite clothes. These will help you decide what size pattern to cut out, depending on how much ease you prefer.
Many patterns are multi-sized. With a multi-sized pattern you can cut out one size for the bust, grade to another for the waist, then grade to another for the hip in order to best match your own measurements.
For example, I generally fit into an Australian size 10 or 12 in ready-to-wear (US size 6 or 8), but my full bust measurement would make me a size 14 in patterns. However, I wear a C cup bra, so going by my high bust measurement I need a size 12 pattern. I am quite honest about my figure strengths and weaknesses, so know that often patterns are too large across my shoulders and much too small around my waist and stomach. So, where possible, I buy a pattern that includes sizes 10, 12 and 14, and make adjustments where necessary depending on the amount of ease that I want and how much ease is included in the garment design.
Pattern envelope front
The pattern front generally includes an illustration and/or photo of the finished garment, often in a few variations which can all be made from the same pattern. These illustrations and photos are generally on tall slim models, so be aware that the proportions may be a little different on your own figure (unless you are tall and slim as well)!
Pattern envelope back
The back of the pattern envelope usually has a line drawing of the back of the garments. Some patterns will have a written description of the garment. Body measurements and finished garment measurements are usually printed on the back of the pattern envelope, in addition to the amount of fabric needed to make the garment.
There will also be a list of suitable fabrics; this is important! Patterns are designed for particular types of fabric weights, drape, weave, thickness, and stretch, so it is essential to choose an appropriate fabric for the pattern in order to maximize your chances of getting a good result. Patterns designed for light to mid-weight woven cottons are a great place to start when you’re beginning to sew. The pattern envelope back also has information about notions; these are the extra things that you’ll need in order to make the garment, like thread, buttons, elastic, zips, trim, etc.

Pattern instruction sheet
Before you get out your scissors and pins, read through the pattern instructions! Most patterns start off with line drawings of the front and back of the garments, in all the views included in the pattern. There is usually an illustration of the pattern pieces, with each piece numbered and identified.

General sewing instructions follow, then a cutting layout.
Choose the layout appropriate for the size you are making, and the width of the fabric that you have chosen. It might be worth highlighting which layout you need to use.
Read through each step of the sewing process. Try to visualize what you’ll be doing. If there are different views included in the same pattern, highlight each step that you are going to follow for the view that you have chosen.


Pattern pieces
Pattern pieces are normally printed on tissue paper. Identify and cut out each pattern piece that you need to make the view you have chosen. Use paper scissors, not your good fabric scissors! You can cut these out roughly outside the outer marked line of each pattern piece.
I usually iron each piece with a dry iron to get rid of any creases and make the pattern pieces easier to handle. Make any alterations that you need, such as shortening or lengthening pattern pieces at the marked adjustment lines. If you make these changes at the marked adjustment lines you keep the proportions and style of the design much more than if you simply added or removed length at the bottom. If you are using a multi-sized pattern you might want to use a highlighter pen to trace over the size you are using, especially in places where you change from one size to another. Lay them on your fabric according to the cutting layout in the instructions, and pin into place.
Pattern markings
Grainlines: Fabric is woven from horizontal and vertical threads. The grainlines are marked on the pattern with long double-ended arrows. These need to be aligned with the vertical threads in the fabric. The cutting layout takes the grainlines into account when showing you how to place the pattern pieces.
Sewing Lines and Seam Allowances: The seam allowance is generally included in the pattern piece, so that the marked line is the cutting line. The sewing line isn’t marked, but is usually 5/8” in from the edge of the pattern piece. The cutting line is printed differently for each size.


Notches: These are the little triangle shapes on the pattern piece. They should be cut outwards when you come to them. They are important points where pattern pieces will be matched together.
Dots and Squares: Mark dots and squares onto the fabric with thread tacks or with a fabric marking pen or pencil or chalk (choose something that isn’t permanent). Once again, these are important points where pieces will be matched together or where stitching will need to start or finish.
Other Markings: Transfer the outlines of darts, pleats or other markings to the fabric pieces with thread tacks or with a fabric marking pen or pencil or chalk (once again, choose something that isn’t permanent).
Getting the Right Fit
Getting clothing to fit well is a huge topic. Luckily, there are plenty of excellent references around to help. You will find that the more clothing you sew for yourself, the more you will know your own body and which adjustments you need to make. And after all, we sew for ourselves so that we can get the fit that we want! As a starting point to getting fit right you need to:
  • know your measurements
  • know your body shape
  • determine how much ease you prefer
  • choose the best size pattern for you
  • check the measurements of the pattern pieces and compare them to your measurements
  • shorten or lengthen pattern pieces at the marked adjustment lines before cutting out the fabric
  • make any other alterations to the pattern pieces before cutting out the fabric
  • use the recommended seam allowances
  • Try the garment on as you go, adjusting it to fit where necessary. A full length mirror helps enormously when fitting garments.
Please Remember when choosing your first project 
  • Don't make it too tough , this should be fun and enjoyable if you are frustrated you will be less likely to complete your project 
  • A skirt or simple dress to start is a good idea
  • The patterns are TINY..... please follow your measurements and not a dress size. For example a size " 10 " in the patterns is a 25 inch waist . In regular uk sizes this is smaller than a size 6. Patterns often run 8-14 , 14-18  18-24 so it can be very easy to fall outside your desired size. 
  • Pick a fabric you like but that is easy to work with such as cotton , linen , wool , denim .
  • Please do not choose stretch , or anything slippy 
  • Avoid pockets, pleats , fly fronts, collars , button fronts. 
Picture
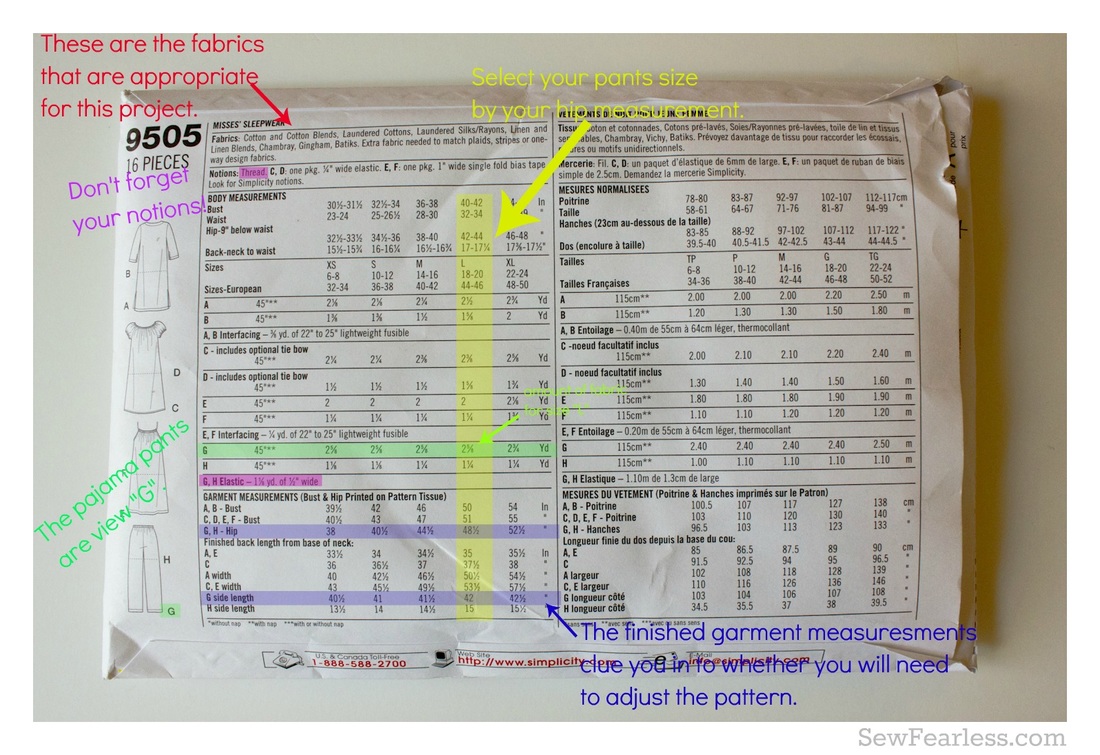
Image found on Sew Fearless 
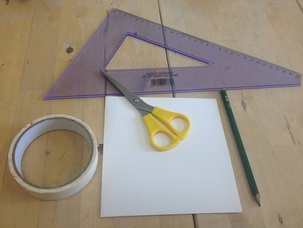
0 Comments

Bralet Tutorial

6/17/2015

1 Comment


You will need: 
Oh La La Bralet Pattern in your size from Etsy 
Fabric of your choice. 1 metre should be plenty
Bra elastic
Hoops for straps
Matching thread.
Fabric Scissors
Pins
Tailors chalk
Sewing machine
1. Iron your fabric
2. Fold your fabric in two matching the selvedge edges together. (Edges which are sealed)
3. Pin them together along the edge to keep the fabric even.
4. Take your pattern pieces, lay the on the fabric to minimise wastage. Pin down, noting your straight of grain & paying attention to which pieces should be cut on the fold and which pieces you need to cut two of.
5. Mark 1.5cm seam allowance around your pattern pieces.
6. Cut out your pattern pieces.
7. You'll need to mark any notches on the wrong side (inside) of your fabric at this stage. You can mark the 1.5cm seam allowance here too. Make sure you label your pattern pieces, eg side front, centre front etc. This will help later when you're putting all your pieces together.
8. Once you've all your pattern pieces cut out you need to pin everything together so it can be sewn.
9. Taking your pieces sew along the wrong side (inside) of the fabric. This will ensure all your seams are on the inside. 
10. Sew your side cups to your front cups, your lower back band to the upper back band.
11. Turn back the sides of the cups 1.5cm and machine hem or hand sew in place, pin the cups to the front band and sew together. Make sure to line up your notches for all your pattern pieces.
12. Attach the back band to the front, at this point you can add a zip at the side or just sew it shut.
13. Press all your seams flat.
14. Turn up the bottom of the band 1.5cm and machine hem or hand sew in place.
15. Add your straps by sewing the plastic hoops to the top of the cup and the back of the bra and slipping the elastic through these and sewing in place.


Your bralet is complete! You can add trim now if you want.


Picture
Fold Fabric, pin pattern pieces, check straight of grain
Picture
Mark notches on wrong side of fabric using Tailors Chalk
Picture
Pin corresponding pattern pieces together ready to be sewn up.
Picture
Sew in place at the 1.5cm seam allowance line
Picture
Finished Bralet, just needs hemming & straps!
1 Comment

Troubleshooting your sewing machine.

6/17/2015

2 Comments

 
Sewing can be daunting when you're unfamiliar with how the machine works. I remember the first time I used my sewing machine it took me a good 45 minutes to thread it properly. I was fit to fling it out a window by the time I got it working! The good news is that the way sewing machines work hasn't changed hugely since they were invented so most problems are easy to troubleshoot!

I'll start with a list of the most common problems you'll encounter which are relatively easy to fix.

1. Bobbin not threaded properly. 
It's very easy to thread your bobbin incorrectly. You need to insert it into the casing so that it pulls anti-clockwise, or to the left if thats easier to remember. Just think of Beyonce, to the left, to the left.

2. Why are there huge mountains of  bunched up thread on the bottom of my fabric??
This  is so common (and annoying) and it's all down to incorrect tension. Either your tension setting is too high or too low. Change the tension setting and re-thread the machine.

3. Why does my thread keep breaking?
This could be down to the quality of the thread you're using. Cotton thread breaks very easily, so does cheap, low quality thread.

4. Skipping stitches.
This is due to having a bent, broken or damaged needle. Change the needle and it should help. If you continue having problems forcing the fabric through the machine can also cause it to skip stitches.

5. Help, my needles keep breaking!
Needles come in different sizes (between an 8-18) for use on different fabrics. The lower the number the lighter the fabric you use it on , e.g silk & chiffon, the higher the number the heavier the fabric, e.g denim. If you're using the wrong needle with the wrong fabric the chances are you'll break it.

Hope these little tips are helpful! :)
2 Comments

Nipple Tassels Tutorial

6/17/2015

0 Comments

 
This is a quick little tutorial to appeal to your inner burlesquer!

You will need thick card, felt or craft foam, depending on your own preference, a scissors, ruler and a pen or pencil and a large roll of sellotape. `

1. Place the roll of sellotape on your card and trace around the interior. (A nice sneaky little cheat which will mean you won't have to work out how to make a perfect circle on your own) This size will pretty much protect your modesty but feel free to size up or down if you wish.

2. Taking your ruler measure the width of your circle, make a mark at the halfway line.

3. Make two marks at the bottom of your circle , (we went with 1.5 cm wide )

4. Draw a line connecting the centre point to your two marks.

5. Cut out this triangle of card ( or felt or craft foam or whatever you decided to use)

6. Taking one edge of the triangle push it over until it's on top of the mark on the other side and glue in place. If you're putting in a tassel that needs to go in before you glue it in place but if you're just making pasties then you're done.

7. Your nipple tassel base/pastie is now complete! All you need to do is decorate it. 
Picture
Picture
Picture
0 Comments

Fashion show time again

5/7/2015

0 Comments

 
0 Comments

The scarf kimono tutorial

5/15/2014

1 Comment


The kimono

Hi ALL , This is a quick no fuss tutorial to make a cheap and cheerful kimono out of 2 scarves.... 
  1. Firstly we bought two scarves from penneys , the width of the scarves was 57 cm wide and 150 length ( this can vary from design to design but it must be wide enough , i would recommend going lower than 45- 50 cm 
  2. both scarves needed to be shortened by 40 cm ( which we will use for the sleeves
  3. the first scarf will be the entire back - 57 cm wide 110 length  NB leave he raw edge for the shoulders to eliminate hemming etc
  4. The second scarf should be cut directly in half length ways giving you two pieces that are 26.5 x 110 cm 
  5. You then need to sew your side seams from hem to armhole leaving 27 cm gap for your kimono sleeve
  6. do that on both side seams leaving the edged side facing in ( raw edges sew together
  7. then sew across the top of the shoulder at a 1.5cm seam 
  8. With whats left from your scarves seam them up at 1cm by folding in half. This will give you your sleeves. 
  9. As before leave the edged part as the cuff to avoid Having to hem
  10. Attach around he 27 sm gap you left in kimono on both sides.
  11. Turn inside out and press and Bravo...
  12. we will be uploading a video shortly to compliment this 
Picture
1 Comment

Heads up!

5/7/2014

0 Comments

 
Picture
The humble hat is one of the more eccentric accessories in a girls' wardrobe.  Its not easy finding the perfect hat but there are plenty of styles to choose from. The straw fedora is ideal for summer and its a shape that suits most faces. I got a bargain straw fedora reduced to 5 euro in TK Maxx that was a life saver on my Ibiza trip. The perfect time to buy hats like this is at the end of the summer of course and save them for the following year. I invested in another fedora in Australia for 35 dollars and its made from raffia a palm which retains its shape so  its ideal for shoving into the overpacked holiday suitcase. Felt fedoras are nice in the cooler weather and can be spruced up with a contrasting band or a feather.
Picture
Trucker caps are another summer staple although not as easy to pull off as other styles. The trucker cap is like the baseball cap but with a lot more attitude and the flatter peak is not always a winner for every face shape. Forever 21 have a variety of trucker caps at the moment perfect for keeping your face sheltered from the blazing Irish sun! Also if you are feeling creative this type of cap lends itself to all kinds of customising with any kind of jewels, embroidery, fabric markers or studs.
Picture
The old reliable beanie is an all year rouner. The beanie is cozy, comfortable, casual and can disguise a bad hair day perfectly what more could you ask of a hat. Beanies are a handy one for the handbag when you're not quite sure what the weather is going to be like (every day in Ireland). 
Picture
From Russia with love comes the fur hat perfect for those chilly winter days! This head gear is not for maximum impact as it will not go unnoticed whenever you are stepping out. The fur hat is instant glamor and opulence and very much a luxury buy.
Picture
Oooh la la! If you're looking  for somethingwith that 'je ne sais quoi' then the beret is for you. The beret is chic, sophisticated and very European. There is an old fashioned charm to the beret and it compliments any dressy ensemble.
Picture
The bowler is brave, bold and British and an excellent addition for an androgynous look.This vintage style hat creates cool whatever you team it with!Trendy-tough-cool fashionistas like Laura Whitmore and Fearne cotton are big fans of the bowler and keep it fun and feminine.
Picture
The 1920s cloche hat is very much a statement of girlish beauty and creates an elegant look. This cap means definite hat hair so its a bit of a commitment and also needs to be teamed with clothes that match that damsel vibe.
Picture
Last but by no means least my favourite type of hat...the cowboy hat/stetson! Pennys have very reasonably priced straw stetsons at the moment that will go with any holiday outfit as Elle MacPherson so kindly demonstrates!
0 Comments

walking in sunshine

4/24/2014

0 Comments

 
Picture
Good summer shoes are a tricky purchase indeed. Not only are your feet not used to being sockless but its also very hard to combine comfort and style. Wedges are a summer favourite and they tick both boxes by making your legs look fabulous while preventing a broken ankles on uneven footpaths! Floral patterned wedges are especially summery and can brighten up a block colour outfit. Walking any sort of distance in summer means that flats are essential...but you can't hide unattractive flats in the sunshine and runners are generally just too warm. Espadrilles are great for short distances and there is such a huge array of patterns to choose from so you can team them with shorts, harem pants, skirts and dresses.
Picture
Due to the rough woven sole of the espadrille they can become a bit hardwearing on the foot but there are plastic alternatives which are slightly more comfortable. I bought a pair of Native shoes, in TkMaxx, for travelling to Australia last year and they were perfect for the heat. Native shoes are made from foam- injection molded-EVA, a lightweight and durable material resembling rubber. The best thing about Native shoes is that you can wash them to keep them fresh and they dry in the sunshine in no time AND they are available in a variety of styles and colours.
Picture
Its no easy feet making flats look hot but one woman who succeeds is Kourtney Kardashian and her choice of sandal is perfect. She is a big fan of the knee high gladiator sandals and they look great with shorts and dresses. The appeal of these sandals for me is that unlike the flip flop or other sandals this gladiator sandal doesn't have that piece in between the toes that's just waiting to cut and chap your downtrodden foot. Wh 
Picture
0 Comments
<<Previous

    Author

    Hi Im Lorna! Head honcho teacher @ WPMD. We hope you enjoy our content x

    Archives

    August 2016
    July 2016
    February 2016
    June 2015
    May 2015
    May 2014
    April 2014
    March 2014
    February 2014

    Categories

    All

    RSS Feed

Location

What Our Students Are Saying:

I have been a student at the When Poppy Met Daisy's for 6 months , Lorna's style of giving individual attention rather than teaching in a class room setting is brilliant. After only a few classes I couldn’t believe how much I learned. I never thought that I’d be making my own dresses so quickly! It’s very rewarding and addictive, I’m always thinking of new ideas for what I can make next, plus it's so much fun! 

Carol Donohue

Find us on socials!


Join our mailing list below!
Join Now